How to install php-login-minimal on Ubuntu 12.04 LTS

In this article I’ll show you how to install the minimal version of the php-login.net‘s login script (see the GitHub repo here) on a standard Ubuntu server – in a very short and a very detailed way.
THE VERY SHORT TUTORIAL:
If you prefer a short tutorial, do it like this: First, make sure you have PHP 5.3.7+ and MySQL 5 running! Then copy the content of the php-login-minimal folder to your server’s web root (or whereever you want to have it) and perform the SQL statements from within both files in the “_installation” folder on your MySQL database (usually via PHPMyAdmin or on the mysql command line). Open the config/db.php file and change the database user and the password where it says “DB_USER” and “DB_PASS“. Your app is now running.
THE VERY DETAILED TUTORIAL:
THE BASIC REQUIREMENTS:
- A server, in this tutorial we’ll use Ubuntu 12.04 LTS as the operation system.
- Apache installed on the server.
- PHP 5.3.7 or higher installed on the server (this includes PHP 5.4+ and PHP 5.5+). PHP introduced some hashing algorithms (that are used in this script) in version 5.3.7, so you definitely need this. This tutorial will show you how to check your PHP version and how to upgrade PHP.
- MySQL 5 or higher installed on the server. This tutorial will show you how to check and eventually install MySQL if it’s not done already.
- You should be able to access your server via SSH.
- You should know the basics of how a server works, how to login via SSH, how to use the linux command line and how to copy files to your server.
THE FURTHER REQUIREMENTS:
Find out which version of PHP your server runs
Create a file called phpinfo.php on your local computer and put the following stuff in there:
<?php
phpinfo();
The function phpinfo(); shows the entire configuration and settings of PHP, so it’s perfect for inspecting and finding out what your installed version of PHP can do and what not. I think it’s a good idea to create such an phpinfo.php on every new server you set up.
Copy the file to your server’s web root folder, usually /var/www/ ! For easily accessing a server via SSH in Windows 7/8 I can recommend WinSCP and Putty. WinSCP let’s you log in via your SSH credentials (username and password OR via SSH key file) and look at your server like in a FTP tool while Putty is a simple, but effective command-line tool. WinSCP will automatically open Putty (already connected to your server) when you log in.
When you have moved the phpinfo.php file to your web root, open your browser and go to
http://www.yourdomain.com/phpinfo.php
You’ll see something like this:
Is your PHP version 5.3.7 or higher ? Fine, then let’s go on ! If not, then you are using a very old version of PHP that should be updated instantly.
By the way, you can also find out your installed PHP version by doing this on the linux command line (but we did it the above way to check if your server displays php files correctly ;)
php -v
THE FURTHER REQUIREMENTS:
Update the PHP version (if older than 5.3.7)
Updating PHP is a big topic, so let’s do it the quick way. To update PHP, log into your server and do this on the command line (or “shell” or “bash”, whatever you call it):
sudo apt-get update
to let your system (beside some other stuff) check for updateable software, then do this to upgrade PHP:
sudo apt-get --only-upgrade install php5
After this is done, restart the Apache server with:
sudo service apache2 restart
Now check the installed version of PHP with a simple:
php -v
Is it 5.3.7 or higher now ? Perfect ! If not, then you should contact your server provider, hoster etc. and ask for an update or simply get a modern server somewhere else. It’s 2014, ladies, and the 5.3 branch of PHP has officially reached the End of Life, which means no more updates for this branch. Seriously, there is really no good reason to use a 3+ years dead version of PHP.
THE FURTHER REQUIREMENTS:
Install MySQL server (if not installed)
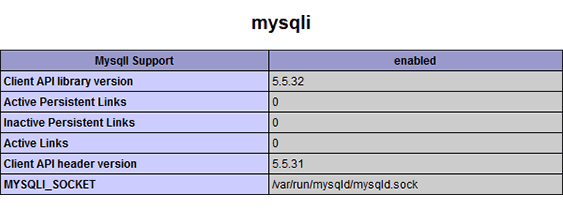
This version of the login script needs a MySQL database, so let’s check if MySQL 5.1 or higher is installed. Have a look into your phpinfo.php output screen and search for the mysqli [the last character is an “i” !] block. It should look like this (the version number is not important right now, usually it will be 5.1, 5.5 or 5.6):
Everything there ? Wonderful! If not, then we have to install MySQL right now: Do
sudo apt-get upgrade
and
sudo apt-get install mysql-server php5-mysql
to install the MySQL server. You’ll be asked for a new password: Choose wisely, choose strong ! By the way: There seem to be problems with VERY long passwords and passwords that use exotic characters, so you should not overcomplicate things.
To activate everything, restart the Apache server:
sudo service apache2 restart
To prove everything is installed correctly, reload your phpinfo.php screen and have a look. You should find a mysqli info block that looks like the picture above !
THE FURTHER REQUIREMENTS:
Install PHPMyAdmin (for easy database handling)
Handling databases is a complex and error-prone thing, so why not using the standard PHP/MySQL-database administration tool ? PHPMyAdmin is my weapon of choice, so let’s install it via these commands (the “update” is only necessary when ubuntu doesn’t find an installable version of phpmyadmin, this happens sometimes on fresh servers):
sudo apt-get upgrade
sudo apt-get install phpmyadmin
You’ll be asked for the MySQL password you have provided in the last step. In a professional application it’s not good to log into phpmyadmin with THIS user/password, and in general it’s a bad idea to have phpmyadmin running on a live server (as it makes attackers’s life much easier), but for this installation tutorial it might be totally okay. You can log into PHPMyAdmin then on:
http://www.mydomain.com/phpmyadmin
Log in with “root” and the password you have given.
THE INSTALLATION PROCESS:
Change the database password
Edit your config/db.php and put in your database user (in your case probably “root”) and the password.
THE INSTALLATION PROCESS:
Copy the script to your server
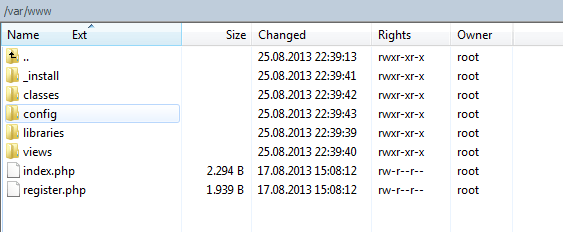
This step is easy: Delete the phpinfo.php from your server (as it is not necessary anymore and will give potential attackers informations about your server) and copy the contents of the php-login-minimal folder to your web root, usually /var/www/. This folder should now look like (screenshot from WinSCP):
THE INSTALLATION PROCESS:
Creating the database
Log into PHPMyAdmin:
http://www.yourdomain.com/phpmyadmin
and create a database called “login” with the SQL statement in “_installation/01-create-database.sql“, then do the same with the file “_installation/02-create-and-fill-users-table.sql” to create the user-table. It’s also possible to import the files. The PHPMyAdmin user interface is quite self-explaining, so this should not be a problem.
The script is now ready to go under your web address:
http://www.yourdomain.com/
SOME WORDS ABOUT LOCAL & REMOTE DEVELOPMENT
It’s always a good decision to develop LOCALLY, which means directly on your own computer, or even better, within a virtual machine hosted on your system. Usually, developing on a live server on the web might be critial, because your tools might have no or weak passwords, your app is in development and therefore attackable, or simply because you just mistyped a bash command and your server now tries to download the entire web.
When developing locally, you could install PHP, MySQL etc by hand or use a pre-combined and pre-configured easy-to-handle development bundle, like Ampps [Win, Mac], EasyPHP [Win], WampServer [Win], SecureWAMP [Win] or even Xampp [Win, Mac, Linux].
—
Please note: Comments are closed!: Sorry, but I had to remove / deactivate the comments in this and other articles as lots of idiots and trolls commented with masterpieces a la “script is shit does not work plz help”, “does not work on android”, “you must change X to Y”, “explain to me” etc. without realizing what this script is, why there’s a readme and several tutorials and lots of commented code and what free-time open-source scripts in general are. It’s disturbing that people build their entire businesses on top of totally free software, written by unpaid volunteers in their free-time, and then they still complain and treat the autors like shit.


